Blog

  • Just Intonation: Thirds and Sixths, an exercise

    I’d like to take the opportunity to write about the benefits of doing intonation exercises with 3rds and 6ths using just intonation.

    • To refine the ear. These are simple intervals, and the difference tone (or combination tone) is strong enough to easily adjust.
    • Flexibility. To make these adjustments, a flutist must be willing to make minute changes of the angle of the air by manipulating any three points: lips, jaw, or rotating the flute in or out.
    • Accuracy in tuning chords (vertical intonation). The theoretical knowledge that, from the bass note, major thirds are 14 cents flatter and minor thirds 16 cents sharper will cut out some of the fishing around for the right direction. (That’s thinking like a flutist. Objectively stated: major thirds are narrower, minor thirds are wider.)
    • Grasp of microtonality. Seriously. Take the second bar of the exercise in the link below. The G is first played as a just major third to an E-flat (=14 cents flat). Then the bass note changes and it becomes the just minor third to E-natural (=16 cents sharp). The difference you have traveled is 30 cents, almost a sixth-tone! You get a feel for these sixth tones, double that, you’ve got third tones and you’re off!

    But why do these exercises? After all, I do not propose that thirds and sixths should always be tuned justly. There are many times when it makes sense to tune these intervals using equal temperment, such as when playing with any fixed pitch instrument. (I wish conductors would also take this seriously. How many times have you worked on intonation during a wind sectional rehearsal, when your ears will naturally drift to just intonation, only to have it completely different when you add the strings, harp, percussion or piano?) It also makes sense to play more temperately when you have the melodic line or when you want to make other expressive adjustments such as raising the leading tone.

    Another place to avoid just intonation is when tuning minor thirds in minor chords (See Claudio’s comment below). Here, the equally-tempered minor third works better. Remember, if you tune an interval justly, the difference/combination tone you should hear will belong to (or complete) the implied major chord. For example, let’s take the minor chord:
    G
    E-flat
    C

    A justly-played C and E-flat will give you a difference tone A-flat, because A-flat is the major chord that the interval C – E-flat implies. That sounds very nice! But add the G and it’s no longer nice because G and A-flat are causing dissonance. This may be why, historically, those beautiful medieval works in minor keys always ended on major chords. See what you can learn about Early Music by delving into the details of intonation! The practices were practical, not academic.

    While playing this exercise, it will also become apparent why, historically, notes with flats were generally played sharper and notes with sharps were generally played flatter.

    Directions for playing with a tuner: during the fermatas, change the pitch of the tuner with the right hand while holding the flute (or piccolo) with the left hand only (use B-flat thumb for Bb and A#). Try not to interrupt playing during this process so you can make the adjustment as finely as possible.

    Click here for the exercise – this is a compendium of exercises, the one with thirds and sixths starts on the sixth page.

  • Tips for Complex Rhythms à la Ferneyhough’s Superscriptio

    Below is some advice for works by composers (such as Brian Ferneyhough) who use complex rhythms not based on pulse-centered activity. I spoke with Mr. Ferneyhough about this subject and he was very clear that in his music, the measure is a “domain of a certain energy quotient” not related to a pulse.

    In other words, a measure can be interpreted as an “area of activity”. The level of activity can easily be reckoned using the starting tempo. From there we can calculate the length of any measure or individual note through simple mathematics.

    So if the rhythm cannot be felt as a pulse, one can at least memorize the speed in which it is supposed to happen. Surprisingly, it’s sometimes much slower than one thinks!

    Ferneyhough’s Superscriptio for solo piccolo is a good example. The basic tempo is an eighth-note at 56. This means a whole note in 4/4 equals 7, because there are 8 eighth notes in a 4/4 bar, and 8 divided by 56 = 7.

    From this number 7 you can deduce all the “odd” time signatures that are not based on divisions of the eighth note. An eighth note quintuplet (or a “1/10” bar) will equal 70 because there are 10 quintuplets in a 4/4 bar (7 x 10 = 70). To find the length of a 3/10 bar you would divide 70 by 3. If you have a 5/10 bar you would divide 70 by 5. An eighth note triplet (or a “1/12” bar) will equal 84 because there are 12 triplets in a 4/4 bar (7 x 12 = 84). To find the length of a 3/12 bar you would divide 84 by 3, and to find the length of a 5/12 bar you would divide 84 by 5.

    What if the compound rhythms are stacked on top of each other, as in Ferneyhough’s other works? This is an imaginary example:
    Let’s imagine as in Superscriptio the starting tempo is an eighth-note at 56. The last six 16ths (at the end of the bar) roughly equal two 16th-note triplets at 64. The nine 32nds under the 9:5 are roughly equal to three sets of 32nd triplets going at 116.

    It could have been notated thus (among other possibilities):

    Here’s the math:
    From above we know that a 1/10 bar equals 70.
    A 4/10 bar will equal 17.5 (70 divided by 4 = 17.5).
    Each 11-tuplet will be 192.5 (17.5 x 11 = 192.5).
    There are 6 of these 11-tuplets at the end. If we think of them as two 16th-note triplets, divide 192.5 by 3 = ca. 64

    5 of those 11-tuplets equals 38.5 (192.5 divided by 5 = 38.5).
    In the 9:5, if you think of the 9-tuplets as 3 sets of 32nd triplets, those triplets go at ca. 116 (38.5 x 3 = 115.5)

    A click track will ensure accuracy without a doubt. However, if you opt for another approach, try the following: memorize the speed of each bar by practicing related bars together. Keeping Superscriptio as an example, you can practice all the bars based on “1/12” while keeping the metronome at tempo 84. (Yes, you will be jumping from measure to measure, or page to page.) Then do the same for all the “1/10” bars, then “1/8” etc. You are not trying to achieve musical continuity yet, this is just an exercise to help relate all the bars with this tempo, and to keep them consistent. When you finally put the piece together, your “internal conductor” will hopefully have a kinesthetic memory of the pulse of each measure and make the tempo changes accordingly.

    Also see my post Seminar with Brian Ferneyhough.
    Other thoughts?

  • Trouble-shooting problems between composers and performers

    There are several categories of potential trouble areas between composers and intstrumentalists:
    1) Basic orchstration mistakes
    2) Unfamiliarity (on either side) with a particular extended technique or effect
    3) Unclear notation

    What I am about to say may seem a bit didactic and Miss Mannerish, but really, it’s common sense. And as you may gather, I’ve had enough bad experiences to know what works and what doesn’t. I’m all ears for other ideas though.

    Flutists, unless you are dealing with a composer/performer, you are the expert of your instrument and in a possible position to educate the composer. See your role as that of an educator, but use it with care because no one likes to feel patronised. To say simply “this is impossible” is very unproductive, even when it comes to a simple mistake such as a low C on the piccolo.

    When faced with difficulty, the first step is to find an alternative. It is sometimes useful to take the initiative and suggest one yourself. As in all possible conflict situations, it is better to retain the “I” message rather than the “you” message. For example: I naively expect composers to know basic orchestration rules for flute and piccolo; therefore I am constantly disappointed. What to do? Some example suggestions: “could I take this low C up an octave? My standard piccolo only plays to low D.” or “given the (lack of) time we have, I would much prefer to play this rapid 4th octave passage on the piccolo rather than on the flute.” or “on this high C, I can achieve a much nicer pianissimo on the piccolo rather than on the flute.” The composer will most likely get the idea.

    Articulation of staccato notes is another difficulty I run into with composers (and even conductors). On the lowest notes, the flute has a long resonating tube, and this takes time to speak. Some head joint cuts are designed so this register speaks loudly and easily. One can always strive to do better, and there are many exercises for the improvement of this technique. However, if you run into serious trouble trying to match the length of notes with string instruments or electronic sounds, you do have an acoustical excuse. If you see an alternative, suggest it. If not, express your willingness to work on improvement, but show the composer the length of tube required to resonate (and thus the physical limitations).

    Often, when puzzling over an extended technique, rather than say “this is impossible” or “I can’t do this”, it helps to ask what the composer actually wants acoustically. Is there another technique which you can do which would be just as or more effective? Or ask where s/he got the technique from. Was it from another player whom you could simply contact for advice? Was it from a book? Were acoustical considerations overlooked such as the difference between a B foot and a C foot, or the difference between any two flutes or flutists?

    Most composers I have worked with are very open and eager to look for solutions together. I once experienced a misunderstanding in an ensemble piece where I was faced with a passage of rapid, high whistle tones (notated exactly so: “whistle tone”) marked forte. The composer, Beat Furrer, actually wanted these sounds loud, which is an acoustical impossibility. He insisted, however, that the previous player had achieved this. I asked him what the previous player had actually done, then tried out a few things according to his description. It turned out that what he wanted were overblown harmonics with a lot of air, which in the context of this ensemble piece did give a whistling effect. So these effects were not whistle tones as I had learned them, nor as they appear in textbooks. I pointed this out to the composer, who did not take my point or make any “correction” in the part. As long as we had found the acoustic solution together, he was satisfied his notation had produced the results he wanted. What to do? In this case, I decided I had done my “duty” by pointing out a possible misunderstanding for the next flutist. To have taken “educator” role too far would have just meant getting into an argument (which I would have undertaken had this been a solo piece).

    This is perhaps a long way of saying to my fellow flutists: let’s work together with composers to encourage the following:

    • a more standardized notation for extended techniques
    • a good working score for the next performer who comes along!
  • Tips for composing and notating aeolian (air) sounds

    Here are some tips on the use of air or aeolian sounds:


    Be sure to specify if you want these sounds:

    A. produced in normal playing position, so the air goes across the flute and produces a pitch that corresponds with the fingers (pitched air / aeolian sound), or
    B. produced inside the flute: i.e., if you want the flutist to cover the embouchure hole and produce a kind of unpitched “white noise”.

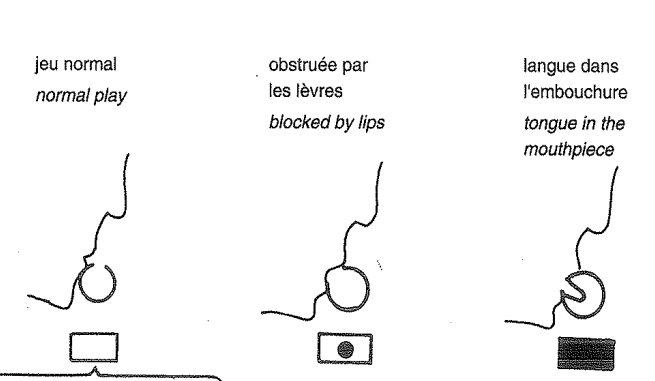
    Here are the symbols showing different embouchure positions from “Flutes au Present” by P. Y. Artaud. Sometimes I have seen the last one (the completely filled rectangle) to generally mean any technique that requires a covered embouchure hole. In Helmut Lachenmann’s music, he uses a filled-in rectangle as a note head to indicate a covered embouchure. A filled-in circle over a note can also indicate a closed embouchure hole – see below.

    Sometimes I am asked to produce type “A” with the specification “no discernible pitch”. This is nonsense: if a flutist blows across the flute they will always produce some sort of pitch. Even with no fingers down, you will get something in the neighborhood of C#. If you want pitched air and feel the need to add written instruction, just write “only air”. If you want unpitched noise, ask the flutist to blow into or inside the flute (cover the embouchure hole). In this position, the flutist can produce a range of unpitched sounds from bright (higher sounding white noise) to dark (lower sounding pink/brown noise) by changing the position of the tongue (changing the vowel shape).

    This leads to my next point: the use of different vowel sounds for color effects. This is most effective with the embouchure hole covered (type “B”). A good use of covered vowels can be found in Hans Zender’s Lo-Shu II. Be aware that vowel sounds are much less marked in normal playing position (type “A”). Vowel changes in normal playing are not very discernible. See my tutorial here where I go into more detail.

    Some general thoughts about notation:
    There are several notational traditions from the Artaud and Levine books concerning the notation of “aeolian” or “air” sounds which I would like to ask composers to avoid. When composing these sounds especially in a situation where rhythm is crucial (especially in an ensemble situation) please avoid the notation that uses empty note-heads*:

    This notation makes the distinction between a quarter note and a half note difficult. When a player is reading, this can be very annoying. It’s good to have a different note shape, but be sure to fill in the note head in when needed so the player can read the rhythms easily:

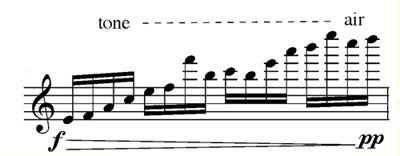
    An easy way to indicate a gradual change from normal sound to air is by using text with a dotted line:

    or simply with a filled circle connected to an open circle by a dotted line:

    * Using empty note heads under a tuplet is less problematic and in most cases acceptable

  • Tips for composing singing and playing techniques

    When writing for the flute and voice there are several things to take into consideration.

    The first may be: where to notate the voice line?
    For solo pieces: if you have an extended or complicated voice line it is customary and practical to use a separate staff below that of the flute line. On the other hand, for short simple passages, I prefer to have the voice pitches on the same line as the flute.

    In the context of an ensemble piece, I would use the same guidelines as above, and please be sure to notate the voice line below the flute. As a general rule, it is best to leave free space above the staff for an ensemble player to mark in beats, que notes, or remarks from the conductor.

    Another consideration is the distortion produced by the simultaneous use of the voice and flute. The use of the voice (as most of you know, I am sure) in conjunction with the flute greatly distorts not only the flute sound, but the voice line and any text that you may want to set. Because of this distortion, getting a true polyphony going can also be tricky if you have a complicated passage. In this case, if you want true polyphony, use two instruments. I prefer the use of the voice and flute as a coloristic element, rather than using it as an attempt to create polyphony.

    If you want to set text that is understandable to the audience, it is not advisable to ask the flutist to play at the same time as speaking. A better technique would be to have the flutist speak or sing the words using the resonance of the flute only. Beware of text with nasal vowels, these produce no resonance on the flute.

    Speaking or singing directly into the flute (with the embouchure hole completely closed) is another option. This of course produces a muffled effect; however, rapid key action will interrupt the muffling and create an acoustic “panning”. This effect can be heard at the beginning of George Crumb’s Voice of the Whale

    Some examples of the most effective uses of flute and voice are Noa Noa by Kaija Saariaho for flute and live electronics, and Toru Takemitsu’s Voice .

    When using a vocal line with the alto flute, there is the option of transposing the vocal line or writing it at pitch. Personally, I prefer having the voice line transposed with the alto flute. Since I have only a relative sense of pitch, it makes sense for me to have the voice always referring to the alto flute pitch; although, if the flutist for whom you are writing has a strong sense of perfect pitch, it would be better to write the voice part at pitch.

  • Composers, Common Mistakes When Writing for Flute

    Some common mistakes are:

    • Low C# to D# trill on flute
    • Harmonics in the first octave
    • Low C and C# on piccolo
    • Percussive effects in the second and third octave: key clicks, tongue or lip pizzicati, tongue ram. While these are not mistakes per se, they are not very effective outside the flute’s first octave.

    see also:
    Writing for Students
    Pet Peeves

  • All music is an articulation exercise (or could be made into one)

    In response to the question “How should I practice articulation?”, I always answer “everything is an articulation exercise, or can be adapted into one”. Spending more money on expensive Leduc editions will not help your tongue. Reading theories about where the optimal point of articulation is (behind the teeth, on the palate, between the lips) can give you ideas but not answers, since nobody seems to be in 100% agreement.

    Since nobody can look into your mouth and tell you where to put your tongue, I’ll repeat another truism: all articulation practice is tone practice. Your ears will tell you what works. Good articulation requires just as much awakening of the ears as the tongue.

    “But I have an OK tone, it’s just when I use my tongue for any amount of time it starts to sound bad!”, you may answer.

    “Good!” I say, “So the ears are switched on.”
    The short answer to this problem is that when you engage the tongue, the air behind it has to keep going despite a short interruption. Many players forget this and instead of increasing abdominal support to keep the energy behind the air stream they tighten the embouchure, or even worse, use the jaw to help the tongue! This is what causes fatigue and lack of control in long articulated passages.

    It could also be the tongue is working too hard. My former teacher Bernard Goldberg used to admonish me be saying “you are only slicing air, not last week’s bagels”.

    There are a few checkpoints: maybe the distance between the Du and Gu of double tonguing is too great. Some find it useful to shorten this distance by thinking the Du Gu action as having a vertical (up and down) dimension to it as opposed to just a back-and-forth motion.

    How to establish efficiency? There are no shortcuts. I’ll go out on a limb and say that if you seriously, seriously devote time to this aspect of playing, your body can’t help but adopt the most efficient means possible – if you include your ears and brain in the process. The ears tell you when it’s good and your brain tells you to stop, re-investigate when it’s not good or when you’re fatiguing yourself. This process will repeat itself a zillion times. Like any muscular activity we need diligent, consequent practice and patience to establish new habits.

    Try the following with Mendelssohn’s Scherzo, it’s an adaptation of Aurèle Nicolet’s method:

    Break the solo into manageable passages (for example, the first passage could be the first 13 complete bars)
    Play the passage slowly legato – each note focused and resonant
    Play the passage slowly with ha ha articulation (no tongue!)
    Play the passage with flutter tongue (either kind, throat or tongue)
    Play the passage double tonguing every single written note (g,g,b-flat, b-flat,c,c,d,d,etc…)
    Play the passage as written

    You notice I try to avoid advice on placement and mechanics of the tongue, and mention of particular “schools” like the French School, which is supposedly the ace of articulation. That may well be, but listen to old recordings from the early 20th century English virtuosi, holy smokes, they could hold their own! Also, South Indian musicians, whose native Dravidian languages use retroflex sounds, where the tongue is actually pointed backwards, can move their tongues at lightning speed. Just listen to any mrdangam player doing the rhythmic solmization of konnakkol (that ta-ki-di-mi stuff)!

    In a nutshell:
    Ears are just as important as the tongue.
    Remember the air produces the sound, not the tongue.
    Invest wisely, get more on your return! In this case it means a long-term committment to intelligent practice.

  • The Highest Peaks: Tips for the Third and Fourth Octaves on Flute

    A lot of these tips can be applied to high-register piccolo playing as well.

    Twentieth Century pioneers in the realms of composition and performance have set the standard for us in terms of how high we are expected to play. For better or worse, we need to have fluency at least up to high D on the flute. Hmm, gee, thanks guys, I guess…….

    The best way to go for it is to include the fourth octave your normal scale and arpeggio routine, at least up to high D. And the younger you start the better. That means now. Tomorrow you will be already older 🙂 If you need an online guide to possible fingerings for the flute, try here.

    But, before launching, please consider these tips. They will save you time and prevent injury. If you have any more to share, I am all ears (while I can still hear!).

    • Wear earplugs during practice sessions that include 4th octave passages, or 3rd octave passages for piccolo. Loud noises can tire you just like muscular activity. If you protect yourself from them, you will have more energy and be able to practice longer. The ordinary wax kind will do the job and are better than the foam ones because they nestle in your ear more snugly.
    • Regular harmonics exercises can give you a good basis for healthy upper octaves. See my tutorial here.
    • Robert Dick’s initial advice: get the angle of the air correct first by finding the whistle tone. Usually we need to be rolled out a bit more that we are used to. Then blow!
    • Think of putting energy into your air stream, not your lips. The lips have to be firm to withstand the onslaught of air, but that’s all. Don’t try to create the sound with them, the source is down below.
    • Where down below? A quick focus on the muscles of your pelvic floor before you blow will help. They should move down a bit in contrary motion to the upward energy that comes with the air (as happens naturally when you cough). Try a quick cough (especially sitting down) to get the feeling.
    • Don’t be tempted to squeeze from your sides, though, as happens when normally coughing! This squeezing of the rib cage through the intercostal muscles (“helped” by bringing in the elbows sometimes) feels normal when coughing or panting after being out of breath, but in flute playing, for a quick burst of air, it is more efficient to have the ribs stable and let the abdominal and pelvic floor muscles do the rest. This way, there are no hard objects (rib bones) to slow you down.
    • In practice, do not be tempted to bend forward to “help” or force the air to come out. Staying upright will actually give the abdominal muscles more flexibility and space for re-bound. The choreography you add to a dramatic passage for a concert is totally up to you. Bending at the knees would be a better option, though. However, for general practice, I would start thinking “up” instead of down or forward.
    • At first practice the fourth octave in your own dynamic, don’t try to do extremes of loud or soft. What comes will come.
    • Come down again! Don’t spend too many consecutive minutes in your practice in the fourth octave without playing some in the first octave, or even just resting and not playing at all.
    • And while you are resting: if the fourth octave passage is technically difficult and requires a lot of technical repetition to learn, finger the passage silently with the flute comfortably in your lap. Watch your fingers, concentrate on relaxed breathing, inhaling as well as exhaling, without any unnecessary stress or tension in your shoulders or hands. Combine this practice with actual playing.
    • Watch intonation. In a repertoire passage, if tempo allows, choose fingerings that are as in tune as possible. If the passage is microtonal, I often use standard fingerings for notes that should be up to a quarter tone sharper in this octave, then play the “normal” notes with flattened fingerings.
    • With a difficult repertoire passage, make a short exercise based on the 4th octave notes and include it in your daily scale and arpeggio practice. Then while practicing the piece, you will have time to work on musical aspects.

    What to do about quieter dynamics?

    This is where you can go “virtual”, that is, create the impression of a real piano even though the sound may be quite present. In some cases, the struggle to play quietly is part of the composer’s esthetic, or sometimes the composer just wants a diminishing of energy and will allow for a “relative” piano. Always ask if possible, don’t knock yourself out trying to achieve perfection if the composer doesn’t want it in the first place.

    If a composer really wants a true piano or pianissimo in the fourth octave, or even in the third octave on flute or piccolo, do your best to:

    • think of approaching the beginning of the note from above. You can practice this by deliberately blowing too high, and then aiming the air down gradually until you hit the sound. No worries if this doesn’t sound great at first, this is something that you can refine over time.
    • keep the air speed up and not pinch with the lips. Easier said than done. Quite often in the practice room I get that buzz from the lips that comes from them being too close together at too high an air speed. Open them up, allow a little airiness in the sound, it may still sound loud up close but it will carry less. I remember Pat Morris saying that in an orchestral or large ensemble situation, a little airiness in the sound can be ok in that register, it can help blend with the strings, and gives a sound that makes it easier for others to blend in with you.
    • a tip I learned from a student to help with the lips: think of flaring the nostrils just before starting the note. I had heard this advice in the context of trying to get more sound in the low register, and was delighted to realize that it works in this situation as well. Why? My guess is that it somehow activates awareness into your upper lip muscles. They may be less likely to press down with the nostrils flared.

    Photo: EPA stock photo